Cyberpunk 2077 photo mode: how to capture Night City
Matt Nursalim
6/16/202610 min read

Cyberpunk 2077's photo mode is CD Projekt Red's in-game camera system that lets you pause gameplay and take full control of composition, depth of field, character poses, lighting effects, and NPC placement. Patch 2.3 (July 2025) expanded it into something closer to a proper virtual photography studio: 27 new NPCs you can place in-scene, frame-advance for single-frame precision, outfit switching for V and spawned characters, and improved DoF controls now moved to the Camera tab. Whether you're brand new to the mode or trying to push your shots beyond the default results, this guide covers controls, technique, and the settings that make the biggest difference. Stick around to the end and we'll walk through every piece of it.
TL;DR
Press N on PC or L3 + R3 on PlayStation/Xbox to open photo mode from anywhere in the game
Switch to Drone camera for free-camera compositions; Patch 2.2 removed the orbital lock so it now moves anywhere in the scene
Turn off Auto Focus in the Depth of Field controls and set Focus Distance manually for cinematic bokeh
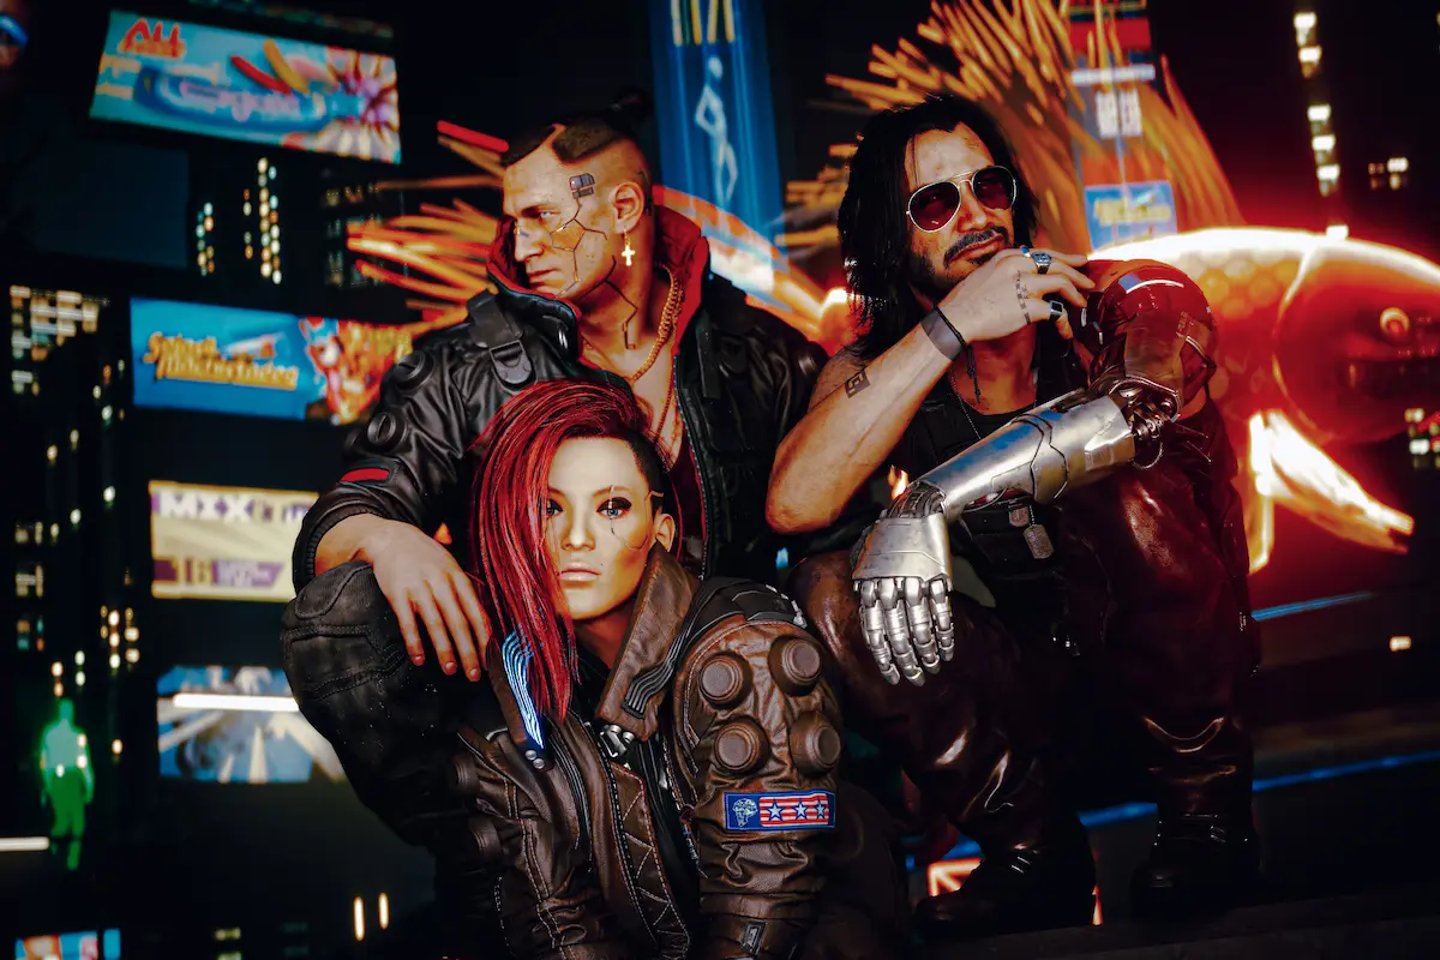
Patch 2.3 adds a Subjects panel with 27 placeable NPCs including Rita Wheeler, Dum Dum, and the Cassel twins; spawn up to three at once
Jig-Jig Street (Westbrook), Afterlife (Watson), and City Center rooftops give you the highest-yield shots in Night City
How to open photo mode and navigate the tabs
Cyberpunk 2077 photo mode opens instantly from anywhere in the game. On PC, press N. On PlayStation and Xbox, click both analog sticks simultaneously (L3 + R3). The game pauses and the camera shifts to give you a view of V. To open photo mode, press N on PC, L3 + R3 on PlayStation, or L3 + R3 on Xbox. To take a shot, hit Spacebar on PC, Square on PlayStation, or X on Xbox. Hiding the HUD works with Tab on PC and R3 on both PlayStation and Xbox.
Navigate between tabs with Q/E on keyboard or LB/RB on a controller. The tab structure after Patch 2.3 is:
Camera — presets, field of view, rotation, camera type (Drone or First-Person), and depth of field controls (moved here in Patch 2.3)
Pose — character pose library across Idle and Action categories, expression, muzzle flash, Look-At Camera
Effects — exposure, contrast, highlights, vignette, chromatic aberration, film grain, color filters
Stickers — up to five stickers from 196 options, frames, backdrops, new iconic quote overlays added in Patch 2.3
Subjects — new in Patch 2.3; placeable NPC characters with outfit switching, up to three active at once
Save/Load — three custom preset slots
The Save/Load option is consistently underused. If you land on a depth of field and exposure combination that works well for Night City portraits, save it. Loading a preset takes a few seconds; rebuilding one from memory mid-session takes far longer.
Depth of field: the setting that separates flat shots from cinematic ones
For most players, Auto Focus stays on and the results look fine. For virtual photography, fine is the ceiling you're trying to break past.
Cyberpunk 2077's depth of field controls give you manual control over focus distance and aperture. With Auto Focus enabled, the camera selects a focal plane and locks it, which works when V is centered and nothing interesting is happening in the background. Switch it off and you decide exactly what's sharp and what falls into blur.
Here's how to use it:
Open the Camera tab (DoF controls were moved here from a separate tab in Patch 2.3)
Toggle Auto Focus off
Adjust Focus Distance until your subject sharpens in the viewfinder
Lower the Aperture value to shallow the depth of field, blurring neon backgrounds behind V into soft bokeh
Raise Aperture for wide cityscape shots where you want both foreground and skyline in focus
One thing Auto Focus consistently gets wrong: when V is standing close to a wall or a parked vehicle, it locks to the nearest surface rather than the character. The result is a sharp wall and a slightly soft subject. Switching to manual and walking Focus Distance back to V's exact position fixes it every time. It takes under a minute and it's the single adjustment that most improves portrait output.
The aperture relationship here mirrors real photography directly. A low aperture number means a wide-open virtual lens and a shallower plane of focus. Night City's neon signs and signage at bokeh distances turn into color pools that read as genuinely cinematic behind a sharp subject.
Using the drone camera for environmental and wide compositions
Patch 2.2 (December 2024) converted the Drone camera from an orbital mode locked around V into a fully free camera that moves independently anywhere in the scene. It's a fundamentally different tool from what it used to be.
Switch to Drone in the Camera tab and the orbital constraint is gone. You can push the camera above a rooftop to frame Night City's skyline with V small in the frame below. You can go low and angle upward to get a power-shot perspective that makes V look like a movie subject rather than a game character at default eye level. Architectural frames, wide environmental shots, and anything where V's default position anchors the composition to the wrong part of the scene all benefit from Drone mode.
The key shift in approach: First-Person and Third-Person cameras start from the question "where is V?" Drone starts from "where's the best frame?" Those produce different answers and different shots.
If you want to see how that spatial freedom translates into portfolio-level work, the Cyberpunk 2077 gallery on CapturedByAllister shows that range across different districts and lighting conditions.
Night City's best screenshot locations, by district
Night City photographs differently depending on where you are. Each district has its own lighting logic, geometry, and visual density, and each one rewards a different compositional approach.
Jig-Jig Street, Westbrook/Japantown — the highest neon saturation in the game. At night, competing signage from every direction creates a natural fill-light setup that's difficult to replicate elsewhere. The geometry forces tight compositions, which suits character portraits more than wide shots. This is the location most often cited in r/PhotoMode for neon-vs-shadow contrast work.
Afterlife, Watson — extreme directional light from overhead ceiling fixtures. The contrast ratio between lit and unlit areas is high enough that character portraits here look like they were set up with an actual key light, without any manual adjustment.
City Center rooftops — the skyline wide shots. At dusk, when the sky still holds color and the building lights are fully on, the megastructure density reads well at distance. This is the location for compositions where Night City itself is the subject, not V.
Badlands, Rocky Ridge area — a complete tonal reversal from the urban environments. Natural light, open sky, desolate geometry. These shots look nothing like the familiar neon aesthetic and that contrast is worth having in a Night City portfolio for exactly that reason.
Japantown plazas, Westbrook — layered signage and crowd density, useful for mid-range environmental shots with depth. A different visual register than Jig-Jig Street even though they share a district.
The compositional logic that applies in Night City transfers across games. The same attention to light direction and contrast that works on Jig-Jig Street applies in the completely different lighting of the Ghost of Tsushima series, and the thinking behind those Badlands wide shots maps directly to the open natural environments in the Red Dead Redemption 2 gallery. The tools change; the questions stay the same.
Two techniques most guides skip entirely
Muzzle flash as a practical light source
The Pose tab includes a muzzle flash toggle. Most guides treat it as a novelty effect. It functions as a directional light source.
When active, muzzle flash casts light outward from the weapon position across V and nearby surfaces. Position V so that the flash direction fills the shadow side of the face and you get a combat-portrait look with actual depth and directionality. The effect reads best at portrait and mid-range distance. In wide shots, the coverage area is too small to make a visible difference.
Chromatic aberration and grain as intentional aesthetic choices
Both are disabled by default for gameplay. For photo mode, they're worth reconsidering as deliberate style tools.
Low chromatic aberration, low grain: the image reads clean and slightly clinical. That's the right register for corporate Night City architecture, megastructure wide shots, and anything where you want the environment to feel constructed.
Turn chromatic aberration up alongside moderate grain and the same scene reads as degraded, surveillance-adjacent, lo-fi. That's the aesthetic that gets the "looks like a still from a 2070s documentary" response. Neither setting is correct. They're different moods for different compositions.
Fixing blurry or soft photo mode output
Soft screenshots are the most common complaint in photo mode, and most have a specific technical cause:
Ray Reconstruction active during capture. Disable it before entering photo mode. It interacts poorly with the photo mode rendering pipeline and is the most frequent cause of unexpectedly soft output.
Auto Focus locked to the wrong focal plane. Switch to manual Focus Distance and confirm the subject is actually sharp in the viewfinder before capturing.
DLSS degrading output resolution. Switch DLSS to Quality mode or disable it for photo mode sessions. The upscaling can introduce softness that's not visible in motion but shows clearly in a still.
Path tracing conflicting with layered effects. Per community reports, path tracing in photo mode produces inconsistent results when combined with multiple Effects tab settings. Disabling path tracing stabilizes the output.
HUD visible in the viewfinder. The saved file doesn't include the UI regardless of whether you hide it. But pressing R3 to hide the HUD gives you a cleaner preview while composing, making it easier to judge actual sharpness before you shoot.
What Patch 2.3 added to photo mode
Patch 2.3, released July 17, 2025, was the most substantial photo mode update CD Projekt Red has shipped for the game.
The headlining addition is the Subjects panel. It contains 27 new NPC characters you can place in your scene, with named characters including Rita Wheeler, the Cassel twins, fixers, Dum Dum, the iguana, and Brendan. Up to three can be active at the same time for group compositions. Both the spawned NPCs and V can now switch between saved Wardrobe outfits directly inside photo mode, which opens up fashion and character-focused shoots that weren't practical before.
Frame-advance is the other practical addition. It steps through gameplay one frame at a time, making it possible to capture the precise peak of a gunfire animation, a melee swing, or a vehicle drift. Before this, catching the right frame in an action sequence meant hoping the photo mode freeze timing landed correctly.
Other additions in Patch 2.3 include improved depth of field controls (now in the Camera tab), an eye-only option for the Look-At Camera feature, new stickers and iconic quote overlays, lights that now spawn around the camera instead of V's position, and a confirmation pop-up on exit to prevent accidental closes after a complex setup.
Patch 2.2 (December 2024) is worth noting separately: it converted the drone camera from orbital to fully free, added aspect ratio options, and introduced NPC spawning as a baseline feature that Patch 2.3 then expanded significantly.
Mods for photographers who want to go further
The vanilla photo mode after Patch 2.3 is the most capable it's ever been. For virtual photographers building a serious portfolio, the mod ecosystem adds another layer on top.
Photo Mode Unlocker 2.3 XL (by SilverEzredes, available on Nexus Mods) is the primary expansion mod. It removes camera distance restrictions, expands the pose library, and unlocks controls the base game doesn't expose. It was updated specifically for Patch 2.3 on July 22, 2025.
Appearance Menu Mod (AMM) handles NPC spawning beyond the three-character Subjects limit, prop placement, and live time-of-day control. Cyber Engine Tweaks (CET) is the base framework most photo mode mods depend on and needs to be installed first.
Mod compatibility shifts with each patch. Before installing any of these, check the relevant mod page on Nexus Mods and confirm the current version supports your game build. The same creative discipline applies with or without mods. The Death Stranding gallery and the Horizon Forbidden West series both demonstrate what portfolio-level virtual photography looks like when the toolkit is limited entirely to the base game camera.
Night City is one of the most visually dense environments in gaming, which also makes it one of the easiest to shoot badly. The competing neon, signage, and overlapping visual information works against you if you're not deliberate about what you're isolating. Manual depth of field, drone camera positioning, and location selection are the three decisions that move the needle most on whether a shot looks intentional or accidental.
To see what these techniques produce at editorial quality, the Night City photo series on CapturedByAllister covers the full range of districts and lighting conditions.
Frequently asked questions
How do you open photo mode in Cyberpunk 2077?
Press N on PC, or click both analog sticks (L3 and R3) simultaneously on PlayStation and Xbox. The game pauses immediately and gives you full camera control. Press the right stick to hide the HUD for a clean shot before capturing.
What did Patch 2.3 add to Cyberpunk 2077 photo mode?
Patch 2.3 (July 17, 2025) added a Subjects panel with 27 new NPCs placeable in-scene, including Rita Wheeler, Dum Dum, and the Cassel twins, with up to three active at once. It also added frame-advance for single-frame precision in action shots, outfit switching for V and spawned NPCs via saved Wardrobe slots, improved depth of field controls now in the Camera tab, an eye-only Look-At Camera option, and new stickers and quote overlays.
How do you fix blurry screenshots in Cyberpunk 2077 photo mode?
The most common cause is Ray Reconstruction being active during capture. Disable it before entering photo mode. Also check that Auto Focus is not locking to the wrong focal plane. Switching to manual Focus Distance and confirming sharpness in the viewfinder before shooting resolves most soft-output issues. DLSS in Performance mode can also introduce softness; switch to Quality mode or disable DLSS for photo mode sessions.
Can you use photo mode during cutscenes in Cyberpunk 2077?
Yes. Photo mode can be triggered during cutscenes to capture character expressions and scripted moments that can't be reproduced in open gameplay. You can also use it to photograph as Johnny Silverhand during missions like Playing for Time and Transmission, which function as playable flashbacks.
What is the best depth of field setting for portraits in Cyberpunk 2077?
Disable Auto Focus and lower the Aperture value in the Camera tab's depth of field section. A lower aperture number creates a shallower focal plane, keeping V sharp while blurring neon backgrounds into bokeh. It works on the same principle as shooting wide-open on a fast prime lens in real photography.
What are the best locations for screenshots in Cyberpunk 2077?
Jig-Jig Street in Westbrook gives you the highest neon density and is best used at night for contrast work. Afterlife in Watson has extreme directional overhead lighting suited to character portraits. City Center rooftops work best at dusk for skyline wide shots. The Badlands around Rocky Ridge offer a completely different natural-light environment that contrasts the urban Night City aesthetic.
Can you switch V's outfit in Cyberpunk 2077 photo mode?
Yes, as of Patch 2.3. You can now switch between V's saved Wardrobe outfits directly inside photo mode without exiting. The same applies to any NPC characters you spawn through the Subjects panel, which allows outfit variation across spawned characters in the same scene.