Death Stranding Photo Mode Guide: Settings & Best Angles
Matt Nursalim
6/17/20269 min read

Death Stranding 2: On the Beach has one of the most complete photo modes in any current-gen game. You access it with the left side of the DualSense touchpad, which pauses gameplay and opens a free camera around Sam. From there you get six settings panels, a studio three-light rig, full character pose and expression controls, and Social Strand Service integration. This guide covers every panel in detail, the shooting techniques that actually produce good results in DS2's post-collapse terrain, how the tools compare to the original Death Stranding, and the one system that most coverage gets wrong. Read through and you'll have everything you need to start shooting with intent rather than luck.
TL;DR
DS2 photo mode opens with the left touchpad; left stick and L2/R2 move the camera
Six panels cover UI, camera, filters, lens effects, frames, and character controls; a separate Lighting tab adds up to three configurable light sources
The three-light rig is DS2's biggest addition and the most underused tool in the entire mode
Pressing X saves to the PS5 Media Gallery and uploads to the Social Strand Service; the Share button saves to gallery only
DS2's instant camera is a separate story mechanic, not the same as photo mode
DS1 carries over the same core tools; the technique translates directly
How to open photo mode in Death Stranding 2
Hold the left side of the DualSense touchpad. After a second or two, gameplay pauses and a free camera opens around Sam's position. The left stick pans the camera; L2 lowers it; R2 raises it. R3 toggles the rule-of-thirds grid. L3 adjusts camera movement speed, which matters when you're trying to inch the frame into a precise position behind a piece of cargo.
One thing worth knowing before you start: the right side of the touchpad makes Sam shout. Opening photo mode in BT territory by pressing the wrong half is an experience most players have exactly once.
Square hides all menus and HUD. Triangle resets every applied setting. X captures and uploads to the Social Strand Service. The Share button saves to the PS5 Media Gallery without an SCS upload. Photo mode works during regular gameplay and most cutscenes, though panel access is reduced in cutscene mode.
On PC in the original Death Stranding, F8 opens photo mode. F12 via the Steam overlay saves the screenshot to file.
Every settings panel in DS2 photo mode, explained
The panels sit across the top of the screen and cycle with L1 and R1.
Game controls UI visibility, player signs, and Odradek scan icons. Hiding signs gives you a cleaner frame. Keeping them in occasionally works if another player's bridge or rope happens to sit naturally in the composition.
Camera is where most of the work happens. Focal length, tilt, focus point, and depth of field all live here. Focal length and camera distance interact in a way the other guides skip over, covered in the technique section below.
Brightness/Filter handles exposure, contrast, and color filters including grayscale, sepia, and dynamic. The Decima engine's lighting model holds up well under heavy desaturation. A grayscale filter over Timefall terrain produces something closer to documentary photography than most games can manage.
Lens Effect has vignette, lens distortion, and chromatic aberration. Lens distortion is the underrated one. At moderate values it warps the ground around Sam subtly, giving wide landscape shots a spherical push that reads well on screen.
Frames adds DS2 logo overlays and background frames for poster-style compositions, useful if you're sharing work that should read as intentional rather than incidental.
Characters is where DS2 separates from most photo modes. Sam's pose and expression (smile, wink, angry, neutral, and others) are adjustable. NPCs including Lou and Dollman have their own controls. Eyeline direction is the detail that changes most about a shot. Sam looking toward the camera reads as a portrait; Sam looking away reads as a landscape with a figure in it. These are different photographs.
The Lighting panel gets its own section below.
How to use DS2's three-light rig (and why most players never touch it)
The Lighting tab adds up to three independent light sources. Position is controlled with the left and right sticks per light. Each source has five adjustable properties: intensity, hue, spread (beam width), softness (edge hardness), and saturation.
Most guides mention the rig exists and move on. The actual application is studio portrait lighting, which DS2's character photography specifically rewards.
A setup that consistently works: one key light slightly above and to Sam's side at a warm hue, medium spread, high intensity. A fill light on the opposite side with a cooler hue, lower intensity, and wider spread to soften the shadow on the far side of the face. A rim light placed behind Sam at high intensity and a tight spread to separate him from dark terrain or sky behind him. That third light is what makes a character shot read as composed rather than snapped.
For BT encounter shots the math changes. A high-saturation amber key light with zero fill creates immediate horror-film contrast. DS2's tar atmospherics do most of the work once the base lighting is set this way.
In the original Death Stranding, you worked around a fixed ambient. The three-light rig is the single biggest upgrade DS2 brought to character-focused photography. If you want a grounding overview of how VP practitioners approach in-game lighting as a creative subject, the what is virtual photography page covers the fundamentals before you go deeper.
Best angles and conditions for Death Stranding landscapes
DS2's terrain runs from post-collapse American plains to Australian desert. DS1 worked with Iceland-influenced mountain geography. Both reward specific techniques that no settings panel will teach you on its own.
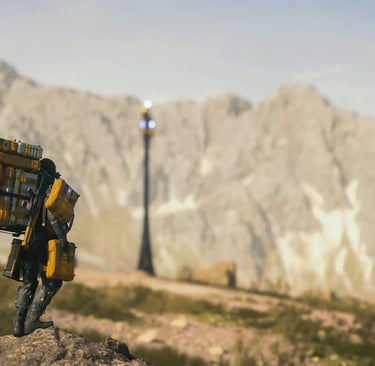
Telephoto compression. Pull the camera as far back as it will go and drop the field of view. The distance between foreground and background elements compresses. Distant ridgelines feel closer. Sam and his cargo stack read as smaller against the terrain, communicating the scale of what he's crossing. Low FoV with maximum camera distance also flattens depth in a way that suits the game's isolationist aesthetic far better than a wide-angle view. This is the single most-used technique in DS landscape photography and the one community photographers have recommended since DS1 launched.
Weather over filters. DS and DS2 have no day/night cycle. Weather is the only variable driving lighting variation, so timing matters differently than in most photo mode games. The period just before full Timefall is the best shooting window: atmosphere is building, particle density is rising, and the light has a diffused quality that no filter replicates after the fact. Active Timefall storms produce backlit conditions with particles in the air. If there's a BT encounter nearby, the tar-black atmospheric haze in the foreground adds a depth layer comparable to what you'd get from ink particles in Ghost of Tsushima, except here it's the apocalypse doing the work.
Sam and cargo as a subject. Death Stranding is one of the few games where the character's burden is physically visible and compositionally useful. Cargo towers, fragile containers, bridges half-built across ravines: all of it is fair game. Frame Sam at distance against a valley floor to communicate scale. Close-up cargo stacks with shallow depth of field work as still life. The game gives you a subject that changes shot-to-shot in a way a stationary environment doesn't. The same subject-versus-environment logic applies in games like Horizon Forbidden West, where Aloy's scale against machine-ruled terrain carries the read of the image.
Particle effects as foreground depth. Environmental particles from BT encounters and active Timefall create simultaneous foreground and background layers. Position with particles between the camera and the main subject for natural depth. You can't control it the way you'd control a light source, but the results are less repeatable, which in this context is a feature.
Photo mode vs the instant camera in DS2 — they are not the same thing
Death Stranding 2 has two separate photography systems. Several guides treat them as one. They're not.
Photo mode is the standard free-camera tool this guide covers. It's available any time during normal gameplay and pauses the scene while you work.
The instant camera is a story-integrated mechanic where characters pose naturally, Polaroid-style, while Sam photographs them. Hideo Kojima clarified at TGS 2024: "Of course there is a photo mode in the game, but something different from that, there is an event in the game where you use an instant camera. The end result will have a bit of impact in the story." The instant camera happens in specific narrative contexts. Results can be posted in Sam's quarters. It does not give you free camera movement.
If you've triggered a character photography session and are looking for the free camera, you're in the instant camera mechanic, not photo mode. They operate independently.
How DS1 photo mode compares to DS2
The core tools carry over. The additions in DS2 build on an existing foundation. Both games share the same access method on PlayStation, left touchpad, though DS1 on PC adds F8 as the shortcut. Camera freedom is identical in both, a full free camera, with DS2 adding a speed toggle for finer positioning. Depth of field is available in both. Where DS2 genuinely pulls ahead is lighting: DS1 gives you ambient only, while DS2 adds a three-source studio rig with per-light intensity, hue, spread, softness, and saturation.
Character controls got a meaningful upgrade too, from Sam-only with limited options in DS1 to full pose, expression, and eyeline control for Sam plus NPCs in DS2. Color filters expanded in DS2, and lens effects gained chromatic aberration on top of the vignette and distortion DS1 already had. Photo sharing moved from the PS gallery and PC Steam to the PS5 gallery plus Social Strand Service integration.
The instant camera is the one feature unique to DS2, and as covered above, it operates as a separate mechanic entirely. The DS1 gallery at CapturedByAllister shows what the original's tools produce when the framing and timing are right, all from an ambient-only lighting setup.
Where do your Death Stranding 2 photos actually go?
Two destinations depending on how you capture.
Pressing X takes the shot, saves it to the PS5 Media Gallery, and uploads it to the Social Strand Service simultaneously. To view SCS photos in-game: press Options, right arrow, Social Strand Service, then the Photos tab. Other players in your Strand network can see them there.
Pressing the Share button saves to the PS5 Media Gallery only, with no SCS upload.
The distinction matters if you're building a presence on the SCS or sharing shots with connected players.
Keep shooting
DS2's photo mode has more depth than the panel count suggests. The gap between knowing what each slider does and knowing when to combine them is where the interesting shots come from. Timefall timing, a rim light separating Sam from dark terrain, the field of view pulled low against a ridge: these decisions are the difference between a screenshot and a composed photograph.
The Stellar Blade photo mode guide covers a different set of tools in a game that rewards similar subject-environment framing decisions, if you want a comparison point.
CapturedByAllister's DS2 photography is ongoing, with new shots added to the portfolio weekly. That's where the work lives.
FAQ
How do you open photo mode in Death Stranding 2?
Hold the left side of the DualSense touchpad during gameplay. The game pauses and a free camera opens around Sam. The right side of the touchpad triggers Sam to shout, not photo mode.
Can you use photo mode during cutscenes in Death Stranding 2?
Yes, with reduced functionality. The free camera is available during most cutscenes, but not all settings panels are accessible in that context.
What is the difference between photo mode and the instant camera in Death Stranding 2?
Photo mode is a free-camera tool available any time during gameplay. The instant camera is a story mechanic where characters pose for Polaroid-style shots and the results carry minor narrative consequences. Kojima confirmed at TGS 2024 that these are separate features with separate purposes.
How do you change Sam's pose in photo mode?
Navigate to the Characters panel using L1/R1. From there you can adjust Sam's pose, facial expression, and eyeline direction. Lou and Dollman have their own separate controls within the same panel.
Where do Death Stranding 2 photos save?
Pressing X saves to the PS5 Media Gallery and uploads to the Social Strand Service. Pressing the Share button saves to the PS5 Media Gallery only, without an SCS upload.
How do you access the Social Strand Service to view your photos?
Press Options, then right arrow, then select Social Strand Service from the menu. Your photos appear under the Photos tab. Other players connected to your Strand network can view them there.
How do you use photo mode in Death Stranding on PC?
Press F8 to open photo mode. Press F12 via the Steam overlay to save the screenshot to file. On PC, photos are not uploaded to any social service automatically.
What are the best settings for landscape shots in Death Stranding?
Pull the camera to maximum distance and lower the field of view for telephoto compression. Shoot during the period just before full Timefall for the best natural lighting. The Lens Effect panel's distortion setting adds subtle ground-warping that suits wide landscape compositions.
Can you hide Sam in photo mode in Death Stranding 2?
Yes. In the Characters panel you can toggle Sam's visibility off, which lets you capture clean landscape shots without him in frame.